Green Abstract Dry-brushing Nail Art Tutorial (St Patricks Day)
Hiya guys! Today is my very last St Patricks Day nail art tutorial before I start moving into nails for any old time of the year! This tutorial is a good transition coz' it's kinda neutral; if you use the right colours it's a St Patricks Day manicure but if you use other colours it can just be a mani for any time of the year. Oh! And you guys will not believe what has happened (it's not good news, I don't know why I made it sound like good news) I have had TWO breaks on my nail! Two and two days in a row. One broke when it got stuck in a draw (the draw that hold my nails polish collection no less) and one the victim of a bread knife while I was slicing bread! So, yeah, I had to shave down my nails a fair bit, and this was all after they were re-growing when they broke a week ago! I, know I know, It's quite a tale! But they'll get back to they're original state eventually....

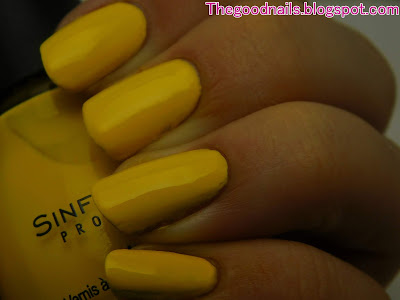
When I mixed the light green polish (Sinful Colors Innocent) and the dark green polish (Jaded Night by Revlon) it ended up lookin' like yellow! These also have a fancy lookin' gold french tip-ish embellishment, that's just there to make them look extra special!

This is really quite odd; I seem to have lost some of my photos for this tutorial.... But I will just have to explain it as best as I can without a gallery's worth of photographs; sorry everybody! First of all, paint your nails a base colour. I am using a white (White On by Sally Hansen) as a neutral background, but you can use anything you like! Then, plop a bit of your nail polish onto a plastic bag or a nail art mat or something of the like then take a clean, dry nail art brush and dip it in the polish, making sure that there is not much on there. Wipe it onto the nail to create an abstract/ dry-brushing look. Next, repeat this process with a second colour (as mentioned above, I used a light and dark green). Lastly, we are finishing this off with the gold french tip...ish thing. To do this use a nail art brush and gold polish (I used Revlon Gold Charm) and carefully draw a line following your smile line. If the utter lack of photos has you confuzzled, then you can watch the video tutorial here!

So that is it! I'm sorry for lack of photos, which is really really odd..... But anyway! I was pretty happy with how these nails turned out! I really like a good old abstracty, dry-brushy kinda nail art, but I think that the gold really makes it look cool and fancy, which is a pretty nice contrast. But enough about me, I wanna hear what you guys think! Do you like abstarct nails? Have you tried dry-brushing before? What colours would you use for these nails? Let me know right here in the comments or on Instagram and Pintrest (my username is thegoodnailsblog)!
May your nails be good and lucky
Gabby


Comments
Post a Comment