Posts

Showing posts with the label French Tip Nail Art

French Tip Stamper-Marble Nail Art Tutorial

Image
Hello guys! How are you all going? I have competed and posted all of my St Patricks Day posts, not sure how I feel about that though; happy? Sad? Excited for new things to come; yeah, it's probably that one but I still miss green and clovers and gold! And, I think you guys should be excited too, because there are lots of great things to come! But, I'm also gettin pumped for Easter! Yes, I know it's still a month away but excitement is still in the air and it's gonna stay in the air until Easter is here!These nails are a celebration of pre-Easter excitement making use of pretty pastel colours and a stamper-marble effect (yay!). Oh and bonus, they are easy! Do you see what I mean when I say they are Easter-air-excitement-inspired (a bit clunky to say out loud but a true description nonetheless)! Oh boy do I love pastels! The polishes that I used for these nails were David Jones Sourise and Revlon Enchanting, as you can see a pretty pair of pastel purple (well, more li...

Green Abstract Dry-brushing Nail Art Tutorial (St Patricks Day)

Image
Hiya guys! Today is my very last St Patricks Day nail art tutorial before I start moving into nails for any old time of the year! This tutorial is a good transition coz' it's kinda neutral; if you use the right colours it's a St Patricks Day manicure but if you use other colours it can just be a mani for any time of the year. Oh! And you guys will not believe what has happened (it's not good news, I don't know why I made it sound like good news) I have had TWO breaks on my nail! Two and two days in a row. One broke when it got stuck in a draw (the draw that hold my nails polish collection no less) and one the victim of a bread knife while I was slicing bread! So, yeah, I had to shave down my nails a fair bit, and this was all after they were re-growing when they broke a week ago! I, know I know, It's quite a tale! But they'll get back to they're original state eventually.... When I mixed the light green polish (Sinful Colors Innocent) and the dark g...

French Tip Dot Nail Art Tutorial for St Patricks Day

Image
Hey guys! How are you all going? Today I'm really happy to be getting back to a nail art tutorial, it's been ages since I have done one of these because the Top Ten Nail Polishes to Wear this St Patricks Day series was occupying all of my time! I wanted to share a simple and fun nail art tutorial which you can use to showcase some of your favourite shades for St Patricks Day! Oh, and by the way my nails are super yellow in the photos because I did this tutorial after swatching all ten of the polishes on the list, I shoulda' used a french manicure polish underneath or something.....sorry guys! So, I wanted to do this tutorial because I think that dots are sooo much fun! Also, I wanted to showcase some of my favourite shades for St Patricks Day but all in one manicure (this is the best thing for when you can't decide what polish to wear; you can have your polish and wear it too, does that phrase work? If it does I am totally gonna use it again!). In this tutorial I ...

St Patrcks Day French Tip Clover Nail Art Tutorial

Image
Hello everybody! Today I'm takin a lil' break from the Top Ten Nail Polishes for St Patricks Day series because I desperately need to share some nail art tutorials with you guys :). Currently, I have only done one St Patricks Dy nail art tutorial which I think is just so sad, so here is another one so that the other post won't be lonely! Oooh! Clovers! Four leaf clovers, even! Let's hope that makes these nails lucky! The polishes that I used for these nails were: Sinful Colors Mint Apple, Revlon Top Speed Spirit, Sinful Colors Innocent and Revlon Golden Charm. On a white base colour which has dried fully, take a polish of your choice (I am using a bluish-green polish called Mint Candy Apple by Sinful Colors) and use the brush from the polish to carefully divide the nail in half. Make sure to brush a lot of the polish off of your brush, or you may have less control over the polish. Next, use a small nail art brush and gold nail polish to go over the end o...

French Tip Lace Sheer Black Nail Art Tutorial

Image
Hi guys! With all my Valentines Day posts over, I wasn't really what to post next, as I had a couple of tutorials and swatches that I hadn't written up yet because I was busy with Valentines posts! It was difficult to decided, as I am one of the most indecisive people on earth and also because I have a really terrible cold, but I eventually chose to go with these lace nails as my first post-Valentines tutorial, coz' I was really happy with how they turned out, and they were real easy! Not too long ago, actually the same time I picked up Sheer Cotton by Revlon, I found a bottle of clear nail polish on clearance (oh! look a punny thing; clear on clear-ance)! When I saw it I think that I must have screamed "YES" at the top of my lungs because I had been lookin' for clear nail polish forever. I used the clear polish to make sheer polish (hey, that rhymes!) and here we are! Oh, and if you guys are interested in making your own sheer polish, let me know in ...

Valentines Day French Tip Drag Marble with Hearts Nail Art Tutorial + announcement

Image
Good day everybody! Valentines Day is soooo close. It came ridiculously fast, don't you think? Now, of course, today is another Valentines post, but that aside from that I have some very exciting news! From today onwards I will be posting nail art tutorial videos and live application swatches on my Instagram ! Wow! Innit that something? In fact, I will be posting a video for this very tutorial , which, by the way, I think I should probably get into now that you now the news! Hearts again! I heart hearts, do you heart hearts? Err, well enough with the silly jokes, I'ma tell you what you need to do these nails! For the drag marble, you will need a  nail art brush, a coral or pink polish and then a red polish. I used Revlon Red by Revlon and Cute Coral from Maxfactor. You are gonna wanna keep your nail polish bottles open, because as you probably know, you need to work fast with drag marbles or else the polish is gonna dry and will no longer be workable. With that in mind I ...

Stripes and Hearts Stamping Nail Art for Valentines Day

Image
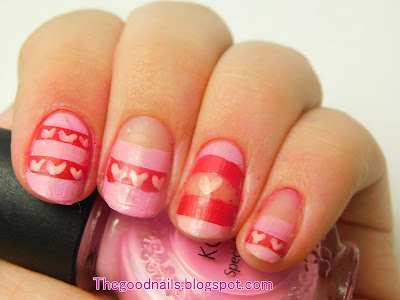
Hello everybody! I am very excited to share with you some beautiful Valentines Day nails that I created with a stamping plate and with a lil' bit of freehand too; best of both worlds, huh? Do you guys wanna guess what was freehand and what was stamping? All, right, all right, I'll just tell you! I used a french tip stamping plate and two different nail polishes (a pink stamping polish by Konad and Revlon Red by Revlon) to create the striped effect, aren't these colours just perfect for Valentines Day? Then, I freehanded all the little hearts where I thought they would look good in a un-named BYS polish. Pretty simple, huh? The stamping plate that I used was 'm19' by Konad. I originally tried, which I now realise is pure insanity, to stamp this on using a stamper that wasn't clear, gasp! It was because I had just bought a new stamper and I wanted to try it out. I got as far as the first stripe and then I was like 'nope, nope, nope, bad idea' and...

Hearts and Stripes French Tip and Reverse French tip Nail Art Tutorial for Valentines Day

Image
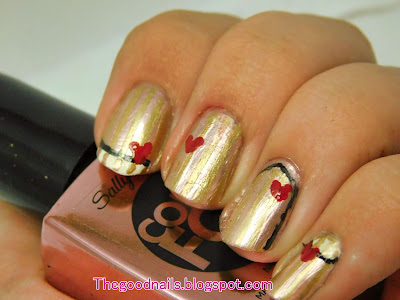
Hiya! What's on and going, everybody? Are you looking forwards to Valentines day? If so, I have the nails for YOU! These were so much fun to do, and they make use french tips in multiple positions! The base colour that I used for these was Sally Hansen's Rose Copper from the Color Foil Range . It's such a pretty colour for valentines day, sooo pretty~! Now, are you ready to get this art on your nails?                                           Look~at~those~hearts! First off, we are going to apply our striping tape. You will need about five pieces. Start by placing one piece in the centre and then place the other pieces so that they line up evenly. One tip I got for you guys is to use your cuticle nippers to place the striping tape on your nail, you can use them like tweezers. For more tips on using striping tape you may like to read this blog post. Next, paint ove...