Posts

Showing posts from January, 2019

Grungy Plaid Nail Art Tutorial

Image
Hello! Today I share with you  a great achievement; plaid nails! Never, ever before have I been able to successfully complete a set of plaid nails, but I practised and I practised and I practised some more and now I can proudly pass on my millions of years (slight exaggeration) of experience to you guys with a grungy plaid nail art tutorials! The two colours that I happened to be practising plaid nails with when I had my eureka moment were red and black, which made me want to do something a bit grungy and dark. These are very 'grungy school-girl punk' inspired. The dark purple base that I used was Mecca Cosmetics Thaisa , the black was by Cotton On and the red is Revlon Red by Revlon. To start off, use a small nail art brush to draw a vertical line in red, then beside it draw a line in black. Then on the other side of the nail draw another  vertical red line. Next add two horizontal red lines at the end of the nail. Finish up the pattern with a black hor

China Glaze 'Peachy Keen' Peach Nail Polish Swatch and Review

Image
Hello, everybody! How are you today? Me? I'm happy coz' I've got China Glaze and a story to share with y'all. Ok, so I was at the shopping centre and hitting up all those shops that sell nail polish (as you do when you are a nail polish addict) and I get to one of my favourite discount stores. In the nail polish section there was a bottle of China Glaze! Gasp! I was so excited because I had never seen an actual, physical bottle of China Glaze in an actual, physical store! Naturally, I grabbed it. When I got to the checkout there were two ladies at the checkout. One of them, who was serving me, scanned the China Glaze and it came up as $2 instead of $5 and because she was really lovely she offered to help me look for any more but I had already looked through very thoroughly (as you do when you see China Glaze in a store) so I said 'Oh, no. It's okay, this was the only one of these in there" and as soon as I said that, the other lady that was at the counter j

Valentines Day Dotted Heart Nail Art Tutorial

Image
Hello there! How are you doing today? I really, really, really wanted to use a dotting tool in some nail art, I was dying to, I had to! So, I did, and now you can too! These, are like, super easy, and like, super cute! I think the hearts are very sweet and Valentines-ish, or Valentines-y or, err, Valentines-like, why is there no word for this? Oh well, there are three of them now (you're welcome, dictionary)!  These nails are only a two step process, well, three if you count painting on a base colour. I used 'White on' by Sally Hansen, two coats of it! So anyway, pick out a red polish (I used Revlon Red by Revlon) and grab yourself a small dotting tool and make dots to form the shape of a heart on your nail. Now, wash, rinse and repeat! Not literally, please don't do it literally. What I mean is, repeat the above step in a light pink colour to create a heart in a heart (a heart of hearts!). I used Smartease from the Sally Hansen Miracle Gel range f

Sinful Colors 'Savage' Teal Matte Nail Polish Swatch and Review

Image
Hello again everybody! Today I am sharing a swatch of a beautiful polish from a brand that I adore; Sinful Colors! I got my hands on this guys a few months ago, it was in the clearance bin for a dollar! Hooray for the clearance bin, hooray! This polish is called Savage. It is a teal colour and dries to a matte finish. Cool! I have never seen that combination of colour and finish in a polish before! One thing that Sinful Colors always impresses me with is their matte formula; from Kylie Jenner to Kandee Johnson it has never once disappointed me and this is no exception. It glides onto the nail smoothly, like butter, and reaches opacity in two coats. I also noticed that is seems to dry quite fast, bonus! This is what the polish looks like shiney! Shine bright polish, shine bright. One thing that I should mention is that this polish was very hard to capture with accuracy as to the colour, so I had to use a photo editing tool to get it looking closer to real life. I worked on i

Stripes and Hearts Stamping Nail Art for Valentines Day

Image
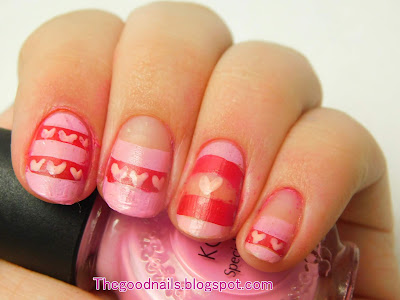
Hello everybody! I am very excited to share with you some beautiful Valentines Day nails that I created with a stamping plate and with a lil' bit of freehand too; best of both worlds, huh? Do you guys wanna guess what was freehand and what was stamping? All, right, all right, I'll just tell you! I used a french tip stamping plate and two different nail polishes (a pink stamping polish by Konad and Revlon Red by Revlon) to create the striped effect, aren't these colours just perfect for Valentines Day? Then, I freehanded all the little hearts where I thought they would look good in a un-named BYS polish. Pretty simple, huh? The stamping plate that I used was 'm19' by Konad. I originally tried, which I now realise is pure insanity, to stamp this on using a stamper that wasn't clear, gasp! It was because I had just bought a new stamper and I wanted to try it out. I got as far as the first stripe and then I was like 'nope, nope, nope, bad idea' and

Sally Hansen Pixel Perfect Topper Swatch and Review

Image
Hello everybody! Whats'a goin' on? I don't think that I have mentioned this before, but I LOVE toppers, they are one of my favourite things to collect! This is a topper that I bought while I was on vacation, I was really excited to try it because I have never tried a topper from Sally Hansen. This is called Pixel Perfect. This topper is packed full of different kinds of matte glitties (that's how I say glitter sometimes); there are larger hex glitties in both white and black as well as smaller black and white hex glitties. There are also teeny tiny little round glitties in black and white and large black bar glitties. While I am not a fan of bar glitters, I think that in this topper it pulls everything together really nicely. I also enjoyed all these different elements, it makes it very interesting to look at, and it's not too much, a really good balance.  There! Now you can admire all the elements inside this polish! Unfortunately it is really h

Heart Shaped Cut Out Nail Art Tutorial for Valentines Day

Image
Hello again, everybody! I have some more nails for Valentines Day, yay! I just love manicures for Valentines Day, they are the cutest! So many hearts and flowers and pretty light and bright colours! This manicure makes the best of both of those things; cute hearts and pretty pretty colours!  I love this combinations of colours for Valentines Day! The polishes that I used in this post were: Sally Hansen Complete Salon Manicure Shrimply Divine, Maybelline Color Show Candy Apple, Sinful Colors Lie-Lac,  Barry M Eat My Dust  and David Jones Sourise.  To start off these nails, first paint them with your base colour, then to create the top half of the heart draw a upside-down 'W' shape at the tip of your nail.  Then complete the heart shape by drawing two lines downwards to form a 'v' shape. Lastly, fill in the shape that you have created using black nail polish to create your finishes heart shape. That's it guys! I have been wearing thi

Models Own Neon Orange Nail Polish "Orange Seal" Swatch and Review

Image
Hello friends! How are you? I have just come back from a little coastal holiday and I brought nail polish-specifically 46 nail polishes. Yep, I know HAUL, H-A-U-L!! I'm not sure if I should turn it into a new series, like my Boxing Day Haul Series which I recently finished, please let me know what you think in the comments! Anyway, I'll get the ball rolling with this Neon nail polish from a brand which I have been dying to try; Models Own. I bought this on sale (actually I bought everything from this haul on sale, that's a LOT of sales!) from Priceline for $2! This polish is called Orange Seal. It is SUPER bright neon polish, which I love for the summertime! There is no white base coat needed for this polish, which I find impressive given how bright it is. But, the formula takes three coats to get fully opaque, as on two coats there are still dark patches. I felt like as I was wearing this polish, I could really clearly see my nail line from certain angles. Also, you

Marbled Mermaid Scale Nail Art Tutorial using Stamper

Image
Hello there everybody! How's it going? It's summer time right now in Australia and I love to use lot's of bright, happy colours for summertime! I thought a fun look for the summertime would be these bright, eye-catching mermaid scale nails. I used a stamper to create a marbled/gradient effect. I really like that technique because it requires no base colour, dries pretty fast and looks awesome! I believe that the technical term for a manicure that uses a different colour of polish on each nail is called a 'skittle-cure', isn't that just a delicious name? Now, are you ready to get some scales in your nails? Now, real quick before I take you guys through the process the colours that I used for these nails. These are in colour order starting with the oranges and ending in the blues. Sinful Colors Social Ladder, Red Earth Heat Wave , Rimmel Tangerine Queen,  Sinful Colors Yolo Yellow, David Jones Sourise , Sally Hansen Smartease, Rimmel Neon Fest, China Glaz

Hearts and Stripes French Tip and Reverse French tip Nail Art Tutorial for Valentines Day

Image
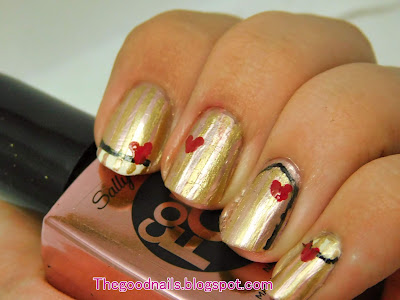
Hiya! What's on and going, everybody? Are you looking forwards to Valentines day? If so, I have the nails for YOU! These were so much fun to do, and they make use french tips in multiple positions! The base colour that I used for these was Sally Hansen's Rose Copper from the Color Foil Range . It's such a pretty colour for valentines day, sooo pretty~! Now, are you ready to get this art on your nails?                                           Look~at~those~hearts! First off, we are going to apply our striping tape. You will need about five pieces. Start by placing one piece in the centre and then place the other pieces so that they line up evenly. One tip I got for you guys is to use your cuticle nippers to place the striping tape on your nail, you can use them like tweezers. For more tips on using striping tape you may like to read this blog post. Next, paint over the striping tape in a gold nail polish, then quickly proceed to the next step. The gold p