Posts

Showing posts from December, 2018

Galaxy Print French Tip Nail Art Tutorial with Striping Tape

Image
Hey guys! It's almost the New Year, oh how time flies! Today I would like to share with you these galaxy print french tip nails that I did yesterday. I really meant to do this post yesterday as well, but I got caught up making and decorating some gingerbread and ran out of time! Despite it being summer-time here in Australia, it was a terribly cloudy (but hot) day, and I had a really tough time taking my photos. You can conquer the whole galaxy with these nails! The nail polishes that I used for these nails were Revlon Knockout, Savvy by DB Sugar Plum, Sinful Colors Endless Blue and Sally Hansen White Tip. For these nails you will needs a few different colours of nail polish; black for the base and purple, white and dark blue to form your galaxy. Take a latex-free cosmetics sponge and cut two small pieces off of it, then cut those in half and apply your your white, purple and blue to each of the sponges respectively. Set aside the last sponge for use another time. Now star

Sportsgirl Nail It! Scented and Matte Nail Polish Swatch and Review (Boxing Day Haul Part 1)

Image
Hello, everybody! I promised you guys in my previous post that I would share with you my boxing day bargains and give 'em a swatch! Weeel, here I am with the first part of my swatchin' for boxin' (day). Just kidding, that's not the title.Unless, y'know, you guys want it to be, in which case consider it done :) As you can see, I picked up three polishes from Sportsgirl. They were fifty percent off, with an 50 per cent discount so they ended up being around $2.50 AUD a pop. When I took these babies home and peeled off the sticker with the discounted price on it, I almost screamed because lying underneath that innocent lookin' sticker was the word 'scented'. God, guys, when I wore Revlon's scented polish it my nose was constantly itchin, it stank so bad. It was so awful I couldn't keep the thing! While I was sceptical at first, I actually thought these polishes smelt really nice! They didn't trigger any allergies or anything at all! Here are

Reverse French Tip Fireworks Inspired Nail Art Tutorial For New Years

Image
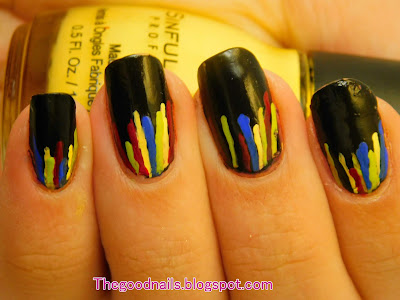
Hiya! The new year is almost upon us guys! Yesterday, I went shopping again to try and pick up some more (nail related) Boxing day bargains, and had a pretty successful haul! I will be sharing my goodies and their swatches with you all very soon, so look forward to it kay' ;). For now I have a simple and pretty nail art tutorial for the New Years! These nails are inspired by New Years fireworks! They were very easy, but a bit time consuming. To start, paint your nails with 1 to 2 coats of black nail polish. Then take your first colour and make a stripe at the end of your nail. Next to this stripe, take another colour and paint another stripe at a different length. Continue this process until you come to the end of your nail plate. A lil' tip I got for you is to keep looking at your work to make sure that the stripes are lining up and lookin' okay. I reckon these would look real pretty with a matte top coat! The polishes that I used in these here nails were, Si

Monochrome Abstract Nail Art using Nail Art Striper

Image
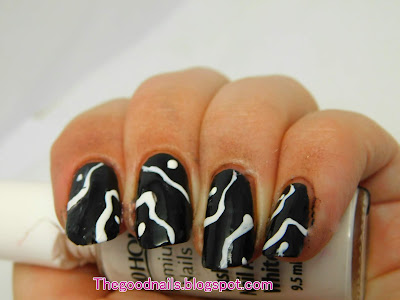
Hiya everyone? Tell me, how was your Christmas? Did any of you find some good boxing day bargains? I found almost nothing in terms of nail polish, but I did find a nail art striper on the cheap. I have never used one before, I really like the brush on it! It's a lot thinner than any nail art brush I have ever used. Here are some monochromatic nails that I did using the new striper. These were incredibly simple, it's really just a sqiggly line with a dot in the middle of it. I call it; the squiggle and dot! C'mon guys, do the squiggle and dot! I love using lots of beautiful colours in my nail art, but monochrome looks awesome in nail art as well! What  do you all think, monochrome or colourful nail art? Are you gonna be doing the squiggle and dot sometime? Let me know what you think down below in the comments!                                                         May your nails be good Gabby

Sally Hansen Satin Glam Sun Sheen Nail Polish Swatch and Review

Image
Hello guys! Merry Christmas to you all! I hope that your special xmas day is amazing and filled with beutiful memories! On this holiday, I bring you a swatch and review of another polish that I recently acquired. This package arrived yesterday and I wanted to share with you all this fantastic nail polish! This is Sun Sheen from the Sally Hansen Satin Glam collection! I am a total orange lover, but I think that even if your not, you'd still love this polish because it's packed full of sparkes. One thing that I noticed is that it takes AGES to dry if you work in thick coats, the best way to work with this polish is to do two thin coats, like, as thin as possible. The polish dries to a satin matte finish, but you can still clearly see all the shimmer and sparkle in there! Some polishes with any kind of matte finish can be very difficult to work with, but this goes on smoothly.  If this finish isn't your cuppa tea, just slap a coat of top coat on there and badda-bing-badd

Festive Candy Cane Christmas Nail Art

Image
Hey guys! About a week ago I had a break on my pointer finger which I fixed using nail glue, but now it's broken again :(. I've put some more glue on the break, and I am hopin' my poor little nail holds out. In the mean time I have some candy cane nails that I did before my nail broke. The hardest part of these nails was getting the teeny weeny little stripes on the teeny weeny candy canes. You can't really see it in the photo, but the middle and pinky finger are painted with one coat of Sally Hansen's On Cloud Shine, which is a sheer polish with a pretty pink shimmer.  The nail polishes that I used in this manicure were; Revlon Jaded Night, Sally Hansen Cherry Red, Sally Hansen On Cloud Shine, Savvy by DB White Chocolate and Revlon Red by Revlon. A while ago I did drag marble which I called 'melted candy cane' nails, so I am happy to have a un-melted candy cane to match :). Btw, wish me luck with my nail. Have a very merry Christmas everyone,

Christmas Pusheen Festive French Tip Cat Nail Art

Image
Hi everyone! Today I am super excited because I get to share with you all my Pusheen nail art! Why is this exciting, you ask? Well, that is because I am an absolute Pusheen fangirl. Pusheen has a really simple (but awesome and adorable) character design which makes it very  difficult to get the features right, since if they are just a liitle bit off, it'll ruin the whole thing. So, I spent ages trying to get it right. But in the end I'm happy with my work! But, guys, I never want to take it off! It was really fun putting Pusheen in all kinds of Christmas themed looks. I love the idea of Pusheen popping out of things like a cat-in-a-box (like jack-in-the-box but with a cat) and we all know how much cats love boxes so the pinky finger has Pusheen popping out of a gift box, wouldn't that be the best Christmas present ever? Cats also love crawling into things, so the middle finger has Pusheen coming out of a Christmas stocking/. The index finger has a

Festive French tip Striping Tape Nail Art Tutorial

Image
Hello! Here I am again with some more chrissy nail art. I love striping tape! It's a tad bit fiddly to use, but there are so many things you can do with it! This design is simple and pretty for the holiday season! The polishes used in this manicure were; Sinful Colors Gold Medal, Sinful Colors Innocence and Revlon Red by Revlon Over your base colour, use the brush from your nail polish to paint a line going across half of the french tip. Cut a piece of striping tape and lay it over the line that you have created. Then clip the tape to size using a pair of cuticle nippers. Repeat the first step using a gold nail polish. Repeat the second step to complete your festive look! There we have it guys! This manicure is super easy, the only part that can be tricky is the use of striping tape. What do you guys think? Do you like striping tape? Is it tricky to use? Let me know what you think in the comments and share your creations with me on Pinterest

Sally Hansen Velvet Texture 'Deluxe' Swatch and Review

Image
Hey guys! Here I am again with another swatch and review! I had quite a journey to get ahold of this polish. Yesterday I missed the postman, so I had to collect the parcel at the post-office. I left in glee with my package filled with nail polish but on the way out one of my toes got smushed by the super heavy door and started bleeding! It hurt pretty bad for a while there, but fortunately it feels a lot better now! I was equally horrified when I opened my package to find that my seven nail polished had been squished into one parcel without any bubble wrap or other protective substance! But anyway, the polishes were in tact and ready to be swatched! So, here it is, Sally Hansen Delux from the Velvet Texture range. The polish is a ultra dark blue colour which almost looks like black. It is a bit of a stainer on the cuticles. The texture on the polish is very light. It doesn't actually feel like velvet but it does look like velvet. I love the way it looks on the nail, it's v

Rimmel Euphoria Taupe Nail Polish Swatch and Review

Image
Hiya again! Wow, this is my third post today! And it's another swatch and review from a nail polish that I recently obtained. This is Euphoria by Rimmel. Euphoria is a taupe polish with a strong pink shimmer. I tried to capture the shimmer in my swatch photos, but it's much stronger in real life. The polish at three coats still shows a little bit of nail line, and I love it, but if it's not your thing you could probably put it over black to still achieve a beautiful shimmery look. The bottle says that it dries in sixty seconds and is opaque in one coat, it tries pretty fast but I wouldn't say it dries in sixty seconds. You can wear this in one coat, but you won't get much of that beautiful pink shimmer. The formula is good as well. I'm not much of a Rimmel lover, but this polish really stands out to me! Overall I really liked this polish! The shimmer is super strong and works really well against the taupe base of the polish. I would definitely re

Avon Pink Pearls Nail Polish Swatch and Review

Image
Hello everyone! Here I am again with a swatch and review post! I haven't swatched anything since my top ten polishes for Christmas list, so this makes me very happy! I couldn't find this particular nail polish anywhere on the internet, so I think that it must be quite old. Please enjoy the swatch! This is "Pink Pearls"by Avon. The polish is a gorgeous light pink colour with a strong shimmer. It's has a pearlescent finish with a tad of nail line showing at three coats. While I love the finish and colour, the formula was very watery and the brush was sooo tiny, like even smaller than the old Essie brush which made the application even more difficult. Even at three coats, there are a few dark spots, which I attribute to the skinny brush. But the bottle, guys, THE BOTTLE. It's amazingly beautiful. Even if I didn't like this polish, I would keep it around just for the bottle, especially the cap! My overall thoughts on this polish is that if yo

Purple Gel Sweater Nails for Christmas

Image
Hiya! It's only a few days till Christmas now, oh my how time flies! Until two weeks ago, I had never worn gel on my nails before, but now I'm kinda obsessed! There are so many different things that you can do with gel, including sweater nail, which are perfect for Christmas time! I didn't think that I would be able to do sweater nails, but they were surprisingly easy!The downside is that they took me forever and they were really hard to photograph! It took me a long time because I had to go over the pattern over and over again. I like the colour purple for these too! The polish is called "Mauve on" by Maybelline. Here we have a close up of my nails on my nail polish covered desk! And that's it guys! What do you think of sweater nails, worth the effort, or too time consuming? Let me know in the comments, and share your creations with me with the #goodnails on Instagram and pinterest! Have a super awesome and merry Christmas, and may yo

Santa Hat Festive French Tip Christmas Nail art Tutorial

Image
Ho ho ho, Christmas is almost here guys! Are you excited? I sure am going to miss doing all these Christmas manicures when the holiday season is over, so for now I wanna keep the Christmas nail art rollin'! On that'a not, here is another Xmas themed tutorial, and it's super easy! I'm sorry I stole your hat Santa! First of all, your going to use a medium sized dotting tool to create a row of dots along your smile line in white nail polish. Then, using the brush from your nail polish bottle, fill remaining space between your dots and your nail line. Using a small nail art brush, draw a drip coming from the edge of the dots. Add one more white dot to the end of the drip to complete your fabulous Christmas mani. There we go guys! One quick, easy and pretty lookin' mani for this holiday season! I just hope Santa forgives me for stealin' his hat! I'd love you to share your creations with me using the #goodnails on pinterest an