Posts

Showing posts from February, 2019

Announcement for the Top Ten Nail polishes to wear for St Patricks Day Post

Hello guys! Today I wanted to do a formal announcement for my top ten nail polishes for st Patricks day. I mentioned how I would be doing it in one post a while back, but I really wanted to do a proper explanation, just in case ya' missed it! So, in case you don't already know, I have an ongoing series for top ten lists for the best polishes to wear for holidays. So far I have done one for Christmas and one for Valentines Day. But, when I did my Valentines Day post I kinda felt sad that I couldn't do a fully detailed review for each nail polish. Every nail polish is special and I really didn't think I could express that well enough in a mini review. So, for this Top ten post for St Patricks day I will be reviewing the polishes one at a time, providing an in-depth review and lot's of photo's, just like I do with regular nail polish reviews. In the title I will include the position of the polish on the list, so that you guys can distinguish between my regular nail...

Black and White Abstract Nail Art Tutorial using Stamper

Image
Hiya guys! I'm so excited! I am so, so, so excited coz' today I am sharing a nail art tutorial for nails that I think look so cool! I hope you like them, and they are so super duper easy, anyone with a stamper and some nail polish can do 'em. This design is something you can do with any combination of colour you like, so I reccon it'll be fun to experiment with if your in that kinda mood. Oh! Or you could do a really cute skittle-cure too! See! It's so versatile, there is lot's of fun to be had here! There they are! Now that I mentioned that skittle-cure idea, that is all I can think about. Skittle-cure, skittle-cure, skittle-cure! Anyway, a practical tip; your gonna wanna use something to protect your cuticle, coz' I didn't and my fingers ended up grey. Then, I had to re-do the photo's coz' it looked terrible. I used tape that time, it went great! First up! Take your stamper and white nail polish (I used Sally Hansen hard as nails...

Zoya Anastasia Reddish-Brown Nail Polish Swatch and Review

Image
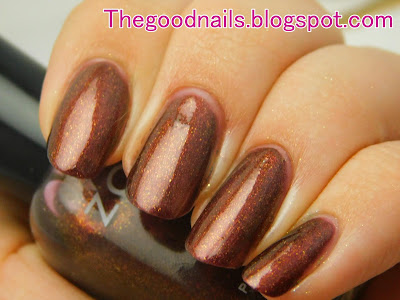
Hiya everybody! I'm so happy today, because ZOYA! I adore Zoya, and today I will be doing my first (but definitely not last) swatch and review of a Zoya nail polish! I bought this polish a while ago with another Zoya polish, then I forgot about it (silly me), so when the package arrived and I opened it I was like "Oh my god! Zoya! I was not expecting you". Once, I wrote a short story and named the main character Zoya, in honour of Zoya nail polish. As you can probably tell, I really love this brand! This polish is called Anastasia. I had just a little bit of trouble figuring out what the colour was; but I think it is best described as a reddish brown colour (I wonder if there are any foxes this colour...I know, my thought are random). Guys, I have never had a reddish brown nail polish before, but know I want more, coz' this is beautiful! I adore the combination of the colour as well as the gold shimmer, it works really well. But, and I am so sorry to say that the...

Green Plaid Nail Art Tutorial for St Patrick's Day

Image
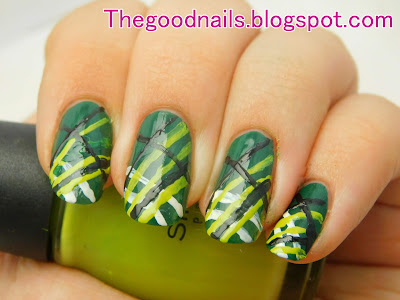
Hello everybody! Yay! A nail art tutorial! And it's plaid, and It's for St Patricks Day, innit that an amazing combination? Well, I know that it is probably a little itty bit early for St Patricks nails, but, I generally think that there is no such thing as being too early for a holiday, especially St Patricks Day, which I love! See! I told you guys that I have mastered the art of plaid . It took me millions of years though. I am totally prepared for my poor cuticles to be stained green for about a month. I am lookin at them now; they have a greenish hue. I am so sorry cuticles, I really am. The polishes that I used for these nails were: Revlon Jaded Night as my base colour and Sinful colors Innocence, Revlon Knockout and Sally Hansen White On for the stripes. First step, use a small nail art  brush and some white polish to draw two stripes going diagonally across the tip of your nail. Next, use a green polish that contrasts to your base colour and draw t...

Bourjois "Taupe Classy" Brown Nail Polish Swatch and Review

Image
Hi guys! Today I am back with another swatch and review, this time it's from a brand whose name I am sure that I am not pronouncing right; Bourjois. This is my second polish from this brand; I must say that the first, which was from the 'So Laque Ultra Shine' range, failed to impress me due to it's bad formula. This polish has some really interesting elements, so let's jump right in! This polish is called Taupe Classy. I can't understand  given that the polish is brown. You see it too right, it's not taupe! Anyway, the polish goes on nicely in two coats for a full opacity. The formula surprised me on this one, it was really good! I had no problems with it at all, which was really different to that other polish that I tried from the So Laque range. By the way, this polish is from the '1 seconde' range, which refers to the time it is supposed to take to apply the polish to each nail. Now let's get brush talkin'. Given that this range ...

Avon "Red Bombshell" Red Nail Polish Swatch and Review

Image
Hi everybody! How are you going? I have the most mind-boggling nail polish to show you guys. I cannot wrap my brain around it, it's driving me crazy(er than normal). But maybe that's just coz' I've got a really bad cold, or maybe it's both that and that this polish is crazifying, or possibly (conspiracy theory) this polish was sent to earth by aliens in order to drive humans insane so that they can take over the planet. Yep, it's definitely that last one. This is Red Bombshell from the Avon nailwearpro line. As you can see, this is a classic red polish, but it is not exactly what it seems! This polish has nail line showing, even at three coats! Gasp! Double gasp! Now, you might not be able to see it in the swatch pictures (you kinda can if you're lookin' for it) but, it is definitely visible in person. The shininess of the polish distracts from the nail line, but it's still there, and I have no idea if this is done on purpose or not! On the fi...

Essie 'Chinchilly' Grey Nail Polish Swatch and Review

Image
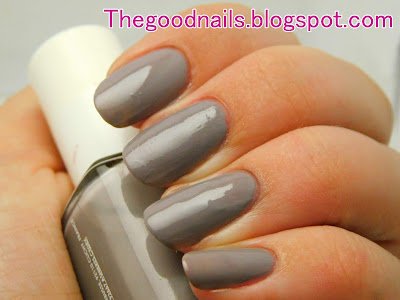
Hello everybody! How have you been? It has been a little bit since I have done a swatch and review, mostly because I was doing Valentines posts, but I have some really cool polishes to show you guys, starting with this polish; Chinchilly by my favourite brand, Essie! Chinchilly! Isn't that name just the most adorable thing? It lends itself very well to the colour of this polish as well. The colour is very hard to describe, I wish I could just call it Chinchilla-fur grey, but that won't do! Hmm, let's see.... I guess if I had to label this I would call it a 'cool-purple-toned-grey', there! It has a name! It is probably totally inaccurate, but, y'know, it's something. I guess that my lack of understanding of this colour only goes to show that It's pretty darn unique. I like it! It's very elegant! Now, let's get talkin' bout' that formula! The formula is just a teeny little bit runny, not a lot, just a little. But, overall I didn...

French Tip Lace Sheer Black Nail Art Tutorial

Image
Hi guys! With all my Valentines Day posts over, I wasn't really what to post next, as I had a couple of tutorials and swatches that I hadn't written up yet because I was busy with Valentines posts! It was difficult to decided, as I am one of the most indecisive people on earth and also because I have a really terrible cold, but I eventually chose to go with these lace nails as my first post-Valentines tutorial, coz' I was really happy with how they turned out, and they were real easy! Not too long ago, actually the same time I picked up Sheer Cotton by Revlon, I found a bottle of clear nail polish on clearance (oh! look a punny thing; clear on clear-ance)! When I saw it I think that I must have screamed "YES" at the top of my lungs because I had been lookin' for clear nail polish forever. I used the clear polish to make sheer polish (hey, that rhymes!) and here we are! Oh, and if you guys are interested in making your own sheer polish, let me know in ...

Valentines Day French Tip Drag Marble with Hearts Nail Art Tutorial + announcement

Image
Good day everybody! Valentines Day is soooo close. It came ridiculously fast, don't you think? Now, of course, today is another Valentines post, but that aside from that I have some very exciting news! From today onwards I will be posting nail art tutorial videos and live application swatches on my Instagram ! Wow! Innit that something? In fact, I will be posting a video for this very tutorial , which, by the way, I think I should probably get into now that you now the news! Hearts again! I heart hearts, do you heart hearts? Err, well enough with the silly jokes, I'ma tell you what you need to do these nails! For the drag marble, you will need a  nail art brush, a coral or pink polish and then a red polish. I used Revlon Red by Revlon and Cute Coral from Maxfactor. You are gonna wanna keep your nail polish bottles open, because as you probably know, you need to work fast with drag marbles or else the polish is gonna dry and will no longer be workable. With that in mind I ...

Valentines Day Vocaloid Inspired Gray and White Hearts Nail Art Tutorial

Image
Hello guys! Today is Valentines Day, so happy Valentines Day, guys! To celebrate this holiday, I will be posting my last Valentines Day nails. I know, I'm sad too, but that doesn't mean we can't enjoy them! A very little known fact about me is that I love anime and other related media such as vocaloid, light novels and manga. These nails are inspired by a vocaloid song called 'two-faced lovers'. I saw the cover of one of the video's for this song, which were grey and white hearts on a grey and white background, and thought 'ooh, pretty....hey, this would look good on my nails', which is my thought process for most things, and so here we are! I really wanted to do the song justice, since it is an absolute classic, and I am pretty happy with how these turned out! The polishes that I used for these nails were Essie Blanc and Heavy Metal from Sally Hansen Xtreme Wear. Alright! First step! On a white base coat, take your grey polish and using the ...

Valentines Day Red Lips Nail Art Tutorial

Image
Hi guys! How are you? I am trying to do as many Valentines Day nail art tutorials as I can, because it's almost over, and I love it so much. I hope that you guys have enjoyed all the posts that I have done for Valentines Da y and will continue to enjoy the posts that I put out over the next few days!   Aren't these cuuuuute! I was dying to do some cute re lip nails before Valentines Day was over, but was holding off on it because I didn't think I could draw lips. But! I was completely wrong, these were super easy to do, so don't worry guys! The polishes that I used for these nails were Essie Blanc and Revlon Red by Revlon. On your white base, draw the top of the lip, as above, using a small nail art brush and red nail polish.  Next, draw the bottom of the lip, as above, connecting it to the top part. Lastly, fill in the entire nail with lips. Make sure to add a few partial lips going off of the edge of the nails. And that's it! These n...

Revlon Top Speed 'Sheer Cotton' Swatch and Review

Image
Hello there! How are you guys? Today I have another swatch and review from Revlon, but this time from the Top Speed range. This is called 'Sheer Cotton'. I was really looking forward to trying this polish, coz' I thought it might be a little like ' Sheer Pearl ' also from the Revlon Top Speed range. That, it was not. But let's get into it! Alright! I will start with the thing that I liked the most about this polish; the colour! The colour is extremely unique; it is very accurate to the colour of natural cotton, as indicated to by the name of this polish (Sheer Cotton). I really haven't seen anything like this before. Unfortunately, the formula is absolutely terrible! The formula is extremely streaky and sheer, it takes four coats to build the polish to full opacity!  I was extremely confused as to how this polish is supposed to be worn; as it is called 'sheer' cotton I was expecting a sheer finish to the polish. To my surprise, the fi...